
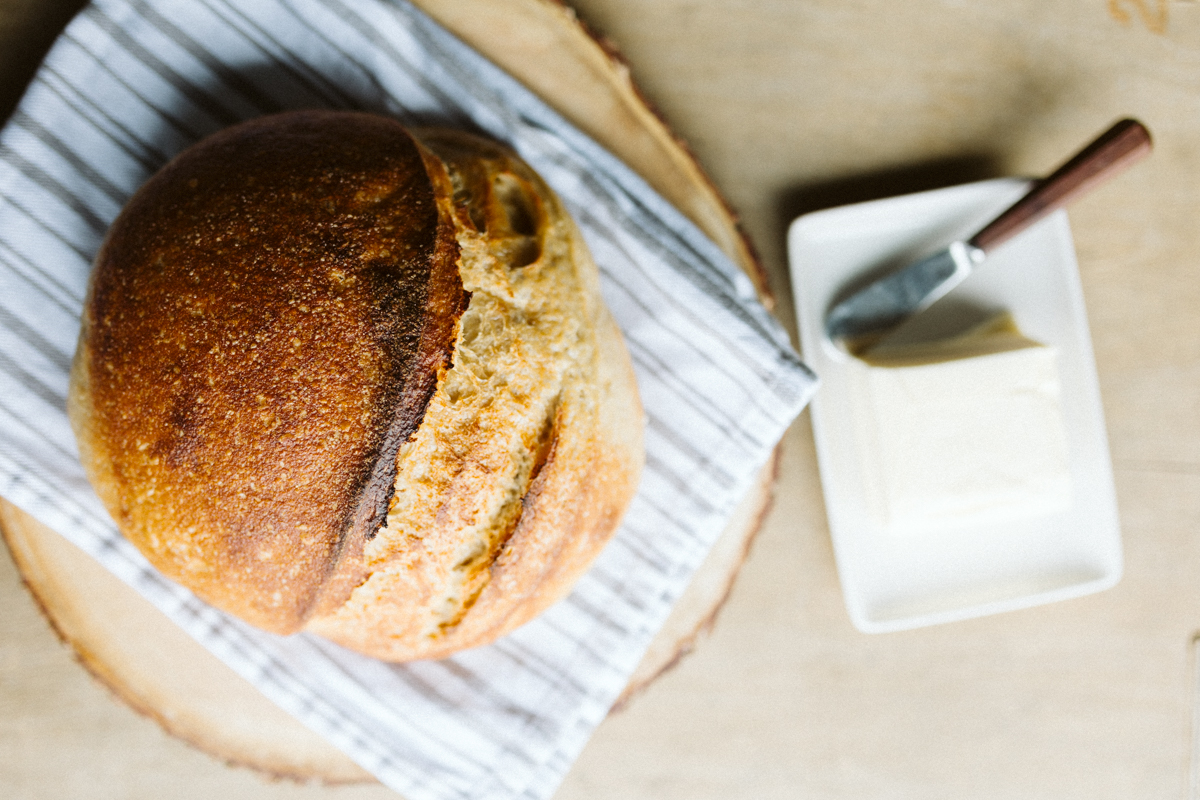
Rustic Sourdough Bread Recipe with Kamut [Khorasan]
RUSTIC KAMUT BREAD RECIPE
Sourdough bread baking is all the rage these days! In the world of bread baking, there are seriously few things rival the satisfaction of crafting a loaf from scratch. When it comes to flavor, texture, and nutritional benefits, sourdough bread stands out. But have you ever considered adding a twist to your sourdough? Let me introduce you to Kamut Wheat (Khorasan Wheat) sourdough bread – a delightful fusion of ancient grain goodness, a golden brown top and the tangy allure of sourdough.
Kamut is set apart by it’s robust nutty flavor, and impressive nutritional profile. Full of great flavor, rich in protein, fiber, vitamins, and minerals, Kamut is a wholesome alternative to modern wheat. If you’re someone who’s health conscious, taking a step into the world of Kamut flout is a smart move!
INGEDIENTS FOR THE KAMUT SOURDOUGH LOAF (40% Kamut Flour)
200g Kamut Flour (Khorasan Flour)
300g Organic All-Purpose Flour (White Flour)
100g Active Sourdough Starter
375g Water
9g Salt
Dash of Rice Flour

RUSTIC SOURDOUGH BREAD WITH KAMUT
Sourdough bread, revered for its complex flavor and airy crumb, has been a dietary staple for centuries. What sets sourdough apart from commercial yeast bread is its natural fermentation process, which involves wild yeast and lactobacilli bacteria. This symbiotic relationship gives sourdough its characteristic tangy taste, while also imparting numerous health benefits.
During fermentation, beneficial bacteria break down gluten and phytic acid, making the bread easier to digest – this is why even someone who doesn’t tolerate gluten well can sometimes get away with a slice of sourdough – and enhancing nutrient absorption. Additionally, sourdough boasts a lower glycemic index compared to conventional bread, and this is great news if you’re someone who watches your blood sugar or is trying to live a healthy lifestyle.
Combining the ancient allure of Kamut with the time-honored tradition of sourdough baking yields a truly remarkable loaf – one that’s not only delicious but also nourishing to both body and soul.
DIRECTIONS
Feed Your Starter: Begin by ensuring your sourdough starter is active and bubbly. If stored in the refrigerator, take it out and feed it with equal parts flour and water, allowing it to ferment at room temperature until it doubles in size.
Mixing the Dough: In a large mixing bowl, combine the Kamut flour, bread flour, and water. Stir until all the flour is hydrated, then cover the bowl with a kitchen towel and let it rest for 30 minutes to 1 hour (autolyse).

Incorporate the Starter: After the autolyse, add the active sourdough starter to the dough mixture. Use your hands or a dough scraper to incorporate the starter thoroughly.
Salt Addition: Sprinkle the sea salt over the dough, ensuring even distribution. Use your hands to gently fold the salt into the dough until fully integrated.

- Bulk Fermentation: Cover the bowl with plastic wrap or a damp kitchen towel and let the dough rise (ferment) at room temperature (68 degrees) for about 5-7 hours, or until it has almost doubled in size and the top of the dough is a little bubbly. During this time, perform a single stretch-and-fold after the first 30 minutes to strengthen the dough.
- Shaping the Loaf: Once the dough has sufficiently fermented, transfer it onto a solid surface. (It can be lightly floured) Gently shape it into a round or oval loaf, being careful not to deflate the dough too much.
- Final Proofing: Place the shaped loaf into a floured proofing basket or a bowl lined with a kitchen towel, seam side up. Cover with a tea towel and let the dough rest at room temperature for 1-2 hours, or until it has visibly expanded and feels airy to the touch.
- Cold Fermentation: This is the part where some magic happens. Place your proofed loaf into the fridge and let the cold ferment take place for 12-24 hours. Sometimes I get impatient and bake after just a few hours and it does still turn out, but won’t have the gluten broken down as much.
- Preheat and Bake: About 20-30 minutes before baking, preheat your oven to 450°F (230°C) with a Dutch oven or baking stone inside. Once preheated, place the dough on a piece of parchment paper. Score the top of the loaf with a sharp knife or bread lame to allow for expansion during baking. Then carefully transfer to the dutch oven and place inside your hot oven. Bake for 30 minutes, , then uncover and bake for an additional 15 min to golden brown.
- Bake with Steam: Cover the Dutch oven with its lid or place a heatproof bowl over the dough to create steam. I always add in a few ice cubes behind the parchment paper to create additional steam because I prefer a softer crust.
- Cooling and Enjoyment: Once baked, transfer the Kamut sourdough loaf to a wire rack and allow it to cool completely before slicing (usually a few hours – and I know it’s SO hard to wait!!). Enjoy slices of this delectable bread on its own, toasted with a drizzle of olive oil, or paired with your favorite spreads and toppings.
Rustic Sourdough Bread Recipe with Kamut [Khorasan]
Ingredients
- 200 grams kamut flour fresh or pre-milled
- 300 grams all purpose flour organic is ideal
- 100 grams active sourdough starter
- 375 grams water room temperature
- 9 grams salt
- dash rice flour only for dusting
Instructions
Feed Your Starter
- Begin by ensuring your sourdough starter is active and bubbly. If stored in the refrigerator, take it out and feed it with equal parts flour and water, allowing it to ferment at room temperature until it doubles in size.100 grams active sourdough starter
Mixing the Dough
- In a large mixing bowl, combine the Kamut flour, all purpose flour, and water. Stir until all the flour is hydrated, then cover the bowl with a kitchen towel and let it rest for 30 minutes to 1 hour (autolyse).200 grams kamut flour, 300 grams all purpose flour, 375 grams water
Incorporate the Starter
- After the autolyse, add the active sourdough starter to the dough mixture. Use your hands or a dough scraper to incorporate the starter thoroughly.
Salt Addition
- Sprinkle the sea salt over the dough, ensuring even distribution. Use your hands to gently fold the salt into the dough until fully integrated.9 grams salt
Bulk Fermentation
- Cover the bowl with plastic wrap or a damp kitchen towel and let the dough rise (ferment) at room temperature (68 degrees).
- After the first 30 min perform one stretch and fold to strengthen the dough.
- Let the bulk fermentation continue for 4 1/2 – 6 hours or until the dough has almost doubled in size. and appears to be a little jiggly/bubbly on top.
Shaping the Loaf
- Once the dough has sufficiently fermented, transfer it onto a solid surface. (It can be lightly floured)
- Gently shape it into a round or oval loaf, being careful not to deflate the dough too much.
- Place the shaped loaf into a floured proofing basket or a bowl lined with a kitchen towel, seam side up. Cover with a tea towel and let the dough rest at room temperature for 1-2 hours, or until it has visibly expanded and feels airy to the touch.dash rice flour
Cold Fermentation
- Place your proofed loaf into the fridge and let ferment for 12-24 hours.
Preheat and Bake
- About 20-30 minutes before baking, preheat your oven to 450°F (230°C) with a Dutch oven or baking stone inside.
- Once preheated, place the dough on a piece of parchment paper. Score the top of the loaf with a sharp knife or bread lame to allow for expansion during baking. Then carefully transfer to the dutch oven and place inside your hot oven. Bake for 30 minutes, then uncover and bake for an additional 15 min to golden brown.
- Bake with Steam: Cover the Dutch oven with its lid or place a heatproof bowl over the dough to create steam. I always add in a few ice cubes behind the parchment paper to create additional steam because I prefer a softer crust.
- Cooling and Enjoyment: Once baked, transfer the Kamut sourdough loaf to a wire rack and allow it to cool completely before slicing (usually a few hours – and I know it’s SO hard to wait!!). Enjoy slices of this delectable bread on its own, toasted with a drizzle of olive oil, or paired with your favorite spreads and toppings.
BENEFITS BEYOND TASTE
Kamut is a winner in my home for more than just the rustic flavors it brings to food, Kamut sourdough bread offers plenty of health benefits:
- Nutrient-Rich: Kamut flour is packed with protein, fiber, vitamins, and minerals, providing essential nutrients for overall well-being.
- Gut Health: The natural fermentation process of sourdough enhances gut health by promoting the growth of beneficial gut bacteria and aiding in digestion.
- Blood Sugar Regulation: With a lower glycemic index compared to conventional wheat bread, Kamut sourdough helps regulate blood sugar levels and may reduce the risk of insulin resistance.
TAKE IT A STEP FARTHER WITH KAMUT BERRIES

If you’re interested in bonus health benefits, you can take it a step farther and mill your own Kamut Wheat berries. I purchase my wheat berries through Azure Standard and you can easily buy them in bulk to mill on your own. Other than the cost saving benefits of this method, the whole grain flour you get when wheat berries are milled fresh has a more dense nutritional profile due to the fact that the oils in the wheat (fat soluble vitamins even like vitamin E!) are at their peak when the flour is milled. To make four shelf stable, they will separate the bran and germ so the flour doesn’t go rancid sitting on a shelf. When milled flour and the entire wheat berry is used, you get the full health benefits! Fresh milled wheat does require refrigeration and has a very limited life span.
![Homemade Tropical Mango Coconut Cookie Recipe [Kamut]](https://amandasrealfood.com/wp-content/uploads/2024/02/FOOD_MANGOCOCONUT-08-768x548.jpg)